Replace Material Read in From Sceneloader Qml
At the heart of every 3D awarding is geometry. Qt 3D-based 3D applications are no different and crave the user to either generate geometry or provide asset files for Qt 3D to load. This web log post demonstrates how Blender and its Python API could be used to write an exporter that generates geometry for Qt 3D.
For those of you not yet too familiar with Qt 3D, let me remind you that Qt 3D is based on an Entity Component Organization. A given Entity gets its behavior defined past the various components it aggregates.
Assuming you desire to return some 3D content, a renderable entity would be equanimous like so:
Entity { components: [ GeometryRenderer { geometry: ... }, Material {} ] } Loading Geometries with Qt 3D
There are currently 3 ways to incorporate geometry in a Qt 3D application:
Using the default meshes provided past Qt 3D Extras
QConeMesh, QCuboidMesh, QCylinderMesh, QPlaneMesh, QSphereMesh, QTorusMesh
These are all QGeometryRenderer subclasses which take intendance of generating geometry based on configurable properties. It'southward up to you to provide a Material that will shade your geometry.
Entity { components: [ ConeMesh { rings: 16 slices: sixteen topRadius: 0.i bottomRadius: one.0 }, Fabric {...} ] } Using QMesh component to load a geometry file
Several backend plugins are available for .obj, .fbx and gltf version i. The list of plugins will likely grow in the time to come (piece of work on a gltf version ii importer is currently ongoing). QMesh is besides a QGeometryRenderer subclass, y'all also need to provide a Material.
Entity { components: [ Mesh { source: "path/to/my/file.obj" }, Material {...} ] } Using QSceneLoader component to load a scene file
QSceneLoader is as well plugin based. At the time of writing, i such plugin is based on the Open Nugget Importer Library (Assimp) which supports the post-obit formats.
At that place's also another plugin which supports gltf version one.
Entity { components: [ SceneLoader { source: "path/to/my/scene.obj" } ] } The subtelty between QMesh and QSceneLoader is that QMesh loads only a unmarried mesh whereas QSceneLoader will load an unabridged scene. Essentially QSceneLoader will generate a subtree of QEntity with QGeometryRenderer and QMaterial components. The nice thing is that QSceneLoader will also instantiate matching Materials to get with each mesh.
In almost cases you lot'll either apply QSceneLoader to load a rather complex scene or, if you know how the scene content is structured, decide yourself on which parts you demand and use several QMesh components.
Issues
At present this is all fine but y'all'll often finish upwards with one of these issues:
- Geometry is generated at run-time which can be costly
- Many 3D formats are text-based (takes up infinite on disk, tedious parsing at run time)
- Loading a scene subtree requires traversing said subtree to recall entities equanimous of components of interest
- QSceneLoader may duplicate materials, effects, attributes depending on the scene file
- Declaring several QEntity with QMesh components tin can be tedious
- Import plugins for QMesh/QSceneLoader are not available on all platforms and may not encompass all formats.
From a general perspective, the current mechanisms get in boring for the developer to control a complex scene. They either completely hide abroad the structure of a loaded subtree or, on the reverse, force yous to know exactly what composes your scene and allow y'all do the heavy lifting of deciding which meshes you care most.
If you are after performance, you demand to know how your scene is structured, which materials are in utilise and how large your geometries are. With this information you tin determine if you lot need to:
- rework yous geometry to reduce the number of vertices to be drawn
- grouping several parts together so that they can all be drawn at once
- reduce the amount of materials required.
So what if instead of loading something blindly, we generated Qt 3D content in advance, as part of our tooling or asset workout work?
Blender
Blender is a free and opensource 3D creation suite. I wouldn't go as far as saying that it's intuitive to employ for a newcomer, but information technology'southward a really powerful tool. In addition, it provides a powerful Python API which can exist used to write importers, exporters or simply automate processes (importing and exporting geometries offline). The prissy thing is that the API is documented, the bad thing is that the documentation is mostly a list of methods and members…
How could Blender solve any of the issues we have?
Instead of generating or loading geometry at runtime, I therefore decided I would try to experiment and write an exporter plugin for Blender. The goal for it would be to generate the QML content for an application (though we could hands extend it to embrace C++ likewise) and consign the geometry buffers to binary files that just need to be read at runtime without requiring whatsoever parsing.
This could solve the issues of slow startup caused by parsing text-based files and possibly duplicating effects and materials. This also solves the case of import plugins deployment (every bit we are now performing this offline) and only shipping binary files that can be read with the readBinaryFile functions on the QML Buffer element. Finally this also gives us the complete structure of our scene.
Buffer { type: Buffer.VertexBuffer data: readBinaryFile("qrc:/assets/binaries/bufferdata.bin") } Creating a Blender Exporter Addon
A blender addon tin can be easily created by subclassing bpy.types.Operator and optionally bpy_extras.io_utils.ExporterHelper which provides convenience helpers too equally a default UI layout.
Overview of an exporter class
- Ascertain members from bpy.types.Operator and ExporterHelper
- bl_idname
- The addon will be accessible in the Blender API though bpy.ops.bl_idname
- bl_label
- The proper name used on the export button UI
- filename_ext
- The name of our format extension if we have 1
- bl_idname
- Set UI properties and export options
- Blender provides default belongings types
- BoolProperty
- StringProperty
- FloatProperty
- IntProperty
- In the Qt3DExporter cases, properties were added to control:
- whether to consign but the selected objects or the whole scene
- whether to consign only the visible objects in the scene
- whether nosotros want meshes to be grouped in a collection
- whether we desire materials to exist grouped in a collection
- whether nosotros want to export a full Qt3D application or just the
- Blender provides default belongings types
- Implement the depict method to lay out our properties
- Think the operator's layout and add rows and columns
- We tin add labels and reference backdrop you have previously created
- Think the operator's layout and add rows and columns
- Define the execute method which will exist the entry point of our exporter
class Qt3DExporter(bpy.types.Operator, ExportHelper, OrientationHelper): """Qt3D Exporter""" bl_idname = "export_scene.qt3d_exporter"; bl_label = "Qt3DExporter"; filename_ext = "" # We set up exporter UI here use_mesh_modifiers = BoolProperty( proper name="Apply Modifiers", description="Use modifiers (preview resolution)", default=True, ) use_selection_only = BoolProperty( proper noun="Selection Merely", description="But export selected objects", default=False, ) def draw(self, context): layout = cocky.layout col = layout.box().column(align=Truthful) col.label("Nodes", icon="OBJECT_DATA") col.prop(self, "use_selection_only") col.prop(self, "use_visible_only") def execute(self, context): # Actual exporting work to be done here def createBlenderMenu(self, context): self.layout.operator(Qt3DExporter.bl_idname, text="Qt3D (.qml)") # Annals against Blender def register(): bpy.utils.register_class(Qt3DExporter) bpy.types.INFO_MT_file_export.append(createBlenderMenu) def unregister(): bpy.utils.unregister_class(Qt3DExporter) bpy.types.INFO_MT_file_export.remove(createBlenderMenu) Most of the piece of work will be done in the execute method. When reaching that indicate you'll want to:
- check which options have been selected by the user
- recall the export path selected
- get together information from the blender scene
- perform whatever post processing or conversion
- write the exporter data in whichever format you're interested
Parsing Blender Data
Collections
We can do a lot of things with the Blender API, the difficult part is really finding out what y'all need
In our particular example nosotros only care (for a first version) well-nigh:
- Objects (bpy.data.objects)
- Collections of objects that reference a datablock
- proper name
- data (reference to a datablock)
- blazon (type of datablock being referenced)
- matrix_local
- matrix_world
- select (whether we are selected or non)
- parent (reference to a parent object)
- Collections of objects that reference a datablock
- Meshes (bpy.data.meshes)
- Collection of datablocks containing information about a mesh
- proper name
- material slots (references to materials used by the mesh)
- uv_layers
- vertex_colors
- vertices (list of position)
- edges (an border references 2 vertices)
- loops (collection of loops, a loop references a vertex and an edge)
- polygons (a list of loops forming a polygon)
- Collection of datablocks containing information about a mesh
- Materials (bpy.data.materials)
- Collection of datablocks containing information about a materials
- proper name
- ambient
- diffuse_color
- specular_color
- Collection of datablocks containing information about a materials
- Modifiers (object.modifiers)
- Collection of modifiers an object can reference
- A modifier is a visual transformation applied to a mesh
- Mirror
- Array
- Solidify
- Subsurface…
- An object referencing a Mesh datablock that has modifiers can exist transformed into a Mesh with the modifiers applied by calling object.to_mesh()
- Lamps (bpy.data.lamps)
- Drove of datablocks containing information almost lamps
- type (POINT, SPOT, SUN)
- color
- intensity
- SPOT
- spot_size (cut off angle)
- constant_coefficient (abiding attenuation)
- linear attenuation
- quadation attenuation
- POINT
- constant_coefficient (constant attenuation)
- linear attenuation
- quadation attenuation
- Drove of datablocks containing information almost lamps
- Scene (bpy.context.scene)
- References objects and render settings for the scene
At present that we know what we care about, the adjacent part is traversing these collections and converting them to Qt 3D content.
Meshes
Showtime we need to get over all the meshes in the scene and get together information required to convert these to QGeometryRenderers, QGeometry, QAttributes and QBuffers.
The idea is to go over each Blender mesh and process and so as follows:
- Triangulate
- Utilise the modifiers information technology references
- Retrieve vertex data (position, normals, texture coordinates, colors)
- Write data into a binary file
- Record description of attributes
- Compute the indices
- For each cloth beingness referenced by the blender mesh
- Create a submesh (basically a QGeometryRenderer in Qt3D)
- For each polygon referenced by the submesh
- compute list of indices based on the loops of the polygon
- generate and tape the IndexAttribute for the submesh
- Generate the IndexBuffer based on the sub meshes
- Write data into a binary file.
- For each cloth beingness referenced by the blender mesh
We continue the information we have produced here for later on.
Materials
Side by side, we demand to get together information about each instance of Material of the scene to later on create and instantiate QMaterial subclasses.
For now the exporter is only recording the proper name, ambient, diffuse and specular color. Later on I'd like to extend that to either export a shader straight or switch to PBR materials.
Objects
Once nosotros've created an intermediary representation for our mesh data and material information, we tin can proceed with the actual exporting of the scene.
The idea is to retrieve all the objects references by the BlenderScene. Then, from these objects, we tin can create a hierarchy.
Finally it'south just a thing of traversing the tree.
For each object:
What type of object we are dealing with?
- Mesh
- Generate a QML File, for each SubMesh generate a QEntity with a QGeometryRenderer, a QMaterial and a QTransform components.
- At this fourth dimension nosotros besides write the index/vertex attributes description besides equally the cloth.
- Generate a QML File, for each SubMesh generate a QEntity with a QGeometryRenderer, a QMaterial and a QTransform components.
- Lamp
- Generate a QML File with QEntity with a QSpotLight/QPointLight/QDirectionalLight and a QTransform components.
- Camera
- Generate a QML File with a QCamera.
All of the in a higher place work has been implemented in a dedicated Exporter class. Information technology is instantiated and called in the execute function of our addon which looks like beneath:
def execute(cocky, context): exportSettings = cocky.as_keywords() exportSettings["global_matrix"] = axis_conversion(to_forward=self.axis_forward, to_up=self.axis_up).to_4x4() self.binaryDirectoryName = "assets/binaries/" cocky.shadersDirectoryName = "avails/shaders/" cocky.qmlDirectoryName = "qml" cocky.userpath = cocky.properties.filepath if not os.path.isdir(self.userpath): cocky.userpath = os.path.dirname(self.userpath) msg = "Selecting directory: " + cocky.userpath cocky.study({"INFO"}, msg) # switch to work dir and create directories os.chdir(self.userpath) if non os.path.exists(self.binaryDirectoryName): os.makedirs(self.binaryDirectoryName) if not os.path.exists(cocky.shadersDirectoryName): os.makedirs(cocky.shadersDirectoryName) if non bone.path.exists(self.qmlDirectoryName): os.makedirs(self.qmlDirectoryName) # Relieve scene into scene scene = bpy.context.scene exporter = Exporter(scene, exportSettings) exporter.export() # Create QML Files exporter.createQMLNodeTree() # Create .qrc file exporter.generateQRCFiles() # Create main.cpp exporter.generateMainCppFile() # Create .pro exporter.generateProjectFile(self.userpath) Does it work?
Well actually it does.
As a exam sample I've used a mesh from blendswap
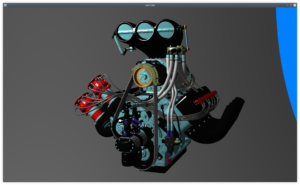
Where to get it?
Hither. Usage instructions are provided on the repository. It should piece of work with pretty much any blender scene. Just make sure you lot have assigned a material to the elements you desire to export.
Side by side steps
- Export Animations
- Export Armatures
- Better Cloth back up
- consign textures
- generate shader when possible
- investigate if the QShaderProgramBuilder could be used to export node trees from blender
- Utilise instancing for Array modifiers
- C++ support
Replace Material Read in From Sceneloader Qml
Source: https://www.kdab.com/exporting-3d-content-qt-3d-blender/